
After experiencing the hustle and bustle of Quito for almost a week, there was nothing more that I wanted to do than disconnect and isolate myself in the mountains for a while. The goal of my South American journey was to do as much hiking as I could, and although Quito is beautiful and has plenty of opportunities for quick hikes, none of them gave me the powerful feeling of being alone with nature.
As soon as I pulled in to Chugchilan hitching in the backseat of a Quichuan’s truck, I knew I was exactly where I wanted to be. I settled into my cabin at Black Sheep Inn before just taking in the views from around the area. A quick yoga class to prepare the body for the upcoming hikes was the only form of physical activity I would do that day. The first hike I did the following morning was the Sky Walk, an epic trail discovered by the inn’s manager, Edmundo when he was 8. A golden hour traipse along the ridge above the farms closed out my second day.


The third day was when I would close out my time in Chugchilan with what is considered one of Ecuador’s best day treks. Starting from Quilotoa, hiking around the rim of the volcano, and back to Chugchilan through stunning scenery and local villages.
If you are staying in Chugchilan, I would advise taking a truck to Quilotoa and then making the trek back, or vice versa. It takes about five or six hours to get from Chugchilan to Quilotoa so making the round trip might make for an exhausting full day of trekking. My trekking group and I decided to share a truck to Quilotoa and then make the five hour journey back on foot. For the eight of us to squeeze into one truck, it cost $30 total.
How To Prepare for the Laguna del Quilotoa to Chugchilan Trek
What should you bring for the day trek from Quilotoa to Chugchilan? In Edmundo’s words, this hike will take you across three or four different climates. Around the crater rim, the wind will be ferocious and it will be freezing. Dress warmly for this stretch, with at least two warm layers under a windbreaker or jacket. Definitely wear hiking boots if you have them. One thing that I wish I brought for this stretch was sunglasses. The fierce winds will often blow sand into your face. It will be a lot less painful if you have something to protect your eyes.
You won’t think much about water for the first part of the trek but once you’re off of the crater, you will start feeling the heat. Bring a hat and sunscreen because I got a bit sunburnt and I never get sunburnt. So if I don’t ever get sunburnt, I can’t imagine how white people will fare without sunscreen or a hat.
I’d recommend at least one liter of water, although I ran out with about 30 minutes left in the hike so maybe bring a little more. Along the crater, there are a few shacks where they will sell hot tea and coffee which gives you a chance to recover and rehydrate. Snacks are also essential for this hike. Black Sheep Inn will pack you a lunch of a veggie sandwich, popcorn, and cookies but if you think you’ll need more food, grab some snacks while at Quilotoa town.
What Is The Trek From Quilotoa To Chugchilan Like?
Let’s split the trek up into a few stages. If you are going from Chugchilan to Quilotoa or doing the whole loop, read it backwards.
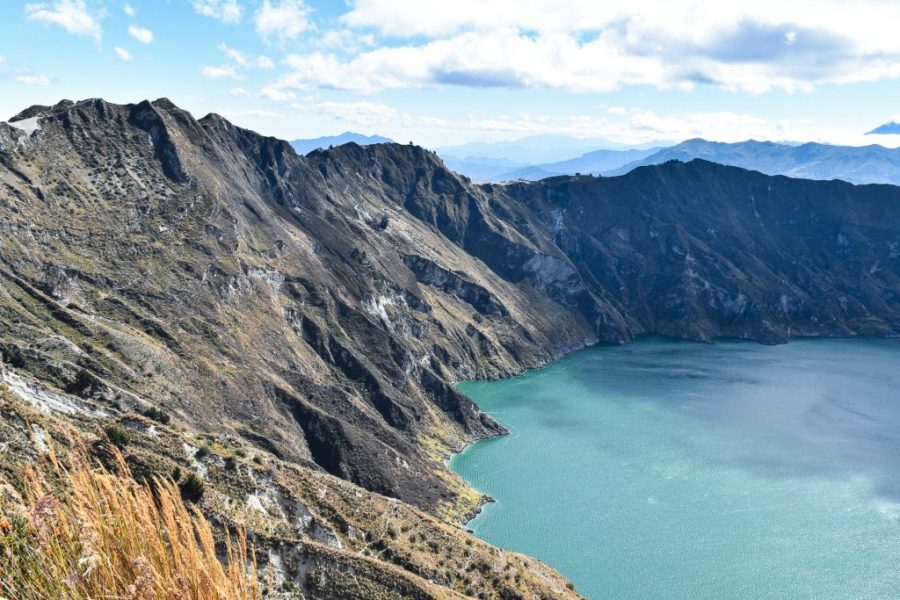
Stage 1: The Crater
This is definitely the highlight of the hike. The Laguna del Quilotoa is absolutely stunning and one of the only places like it in the entire world. The terrain here is mostly rocky and sandy. The views are incredible but between the strong winds, unstable terrain, and the steep drops, this might be the most miserable and treacherous stretch of the hike. It takes about an hour and a half around the crater before you get to the shack where you can grab some hot chocolate and hot tea. Once you make it here, take the road behind the shack down the mountain. For the next half hour or so, you’ll be descending down a ton of switchbacks.
Stage 2: Through Guayama Town
Once you get further down the switchbacks, you’ll have a choice to make. The safe route or the “extrema” route. We took the extrema route because the switchback life gets a bit boring. It actually doesn’t get that extreme until you’re well past Guayama town but just keep walking along the route towards the small village of Guayama. Take a left once you’re at the small volleyball court. About ten minutes down the road, there’s a nice picnic spot underneath the trees where you can have lunch. From Guayama, it is only about two hours until you make it back to Chugchilan.

Stage 3: Through the Valley
You’ll reach a small little house with a few pigs, goats, and sheep. From there, take the steep route down towards the canyon. There will be a sign that says Chugchilan and pointing down a treacherous looking route. The next half hour or so will be a steep descent on unstable terrain so take it slow. For people who decided to go from Chugchilan to Quilotoa, I salute you. This part seems miserable to endure.
And we almost had to endure it. Once we finished that stretch, we found that a landslide had wiped out part of the trail along the canyon. Our group of twelve had to make a decision. Go back up all the way to the crossroads between the safe route and the extrema route, or get creative. A 15-year old in our group crawled across what we dubbed the chasm of death and served as one of our two anchors. One by one, we ran across the collapsing sandy chasm with a person on each side to grab us. The final person crawled across and we saved ourself a brutal 20 kilometer return trip.
Stage 4: The Return
The final stage is relatively boring. You’ve seen most of the incredible scenery and now it’s all about making it back home. More switchbacks up the canyon will test your endurance but every trudge is still a step closer. Treat yourself to an ice cream as you walk through Chugchilan town before you return to your accommodation triumphantly.
In Conclusion…
This was one of my favorite hikes I have ever done. There were very few others on the trail aside from our group and we truly felt like we were alone with nature in all of its beauty. This was such a remote and untouched region of Ecuador, despite Quilotoa being one of Ecuador’s most iconic destinations. It makes for a popular stop for a quick day trip, but very few people actually make the trek. Because of this, the route is minimally-trafficked.
And if you’re in Chugchilan, I can’t recommend the Black Sheep Inn enough. It was one of the best places I have ever stayed and truly emphasized sustainability and eco-travel. Freshly made vegetarian meals every day, unlimited free pastries to snack on, and the most beautiful property and location made it well worth treating myself for a few nights. For a bunk, it is only $35, with all of your meals included. You also don’t have to worry about spending anything for activities as all of the treks you can do in the area can be done for free, although you can hire a guide if you feel the need to.
Other activities to do in the area include horseback riding, visits to local farms and a cheese factory, a hike to a stunning cloud forest, or otherwise just enjoying the incredible scenery.


If this post helped you out, show some love and support for the blog and help keep my adventures going by buying me a beer! My adventures are entirely self-funded, so any show of support is greatly appreciated, and allows me to keep writing helpful travel guides and creating travel content to help you all travel the world on a budget.
Sounds like an awesome butchallenging hike… You certainly have put Ecuador on the map for me. Another place to visit… How to fit it all in though…
Lieve